Technique: Just Ride Better! Pt 2
By Doddy, Mountain Biking UK

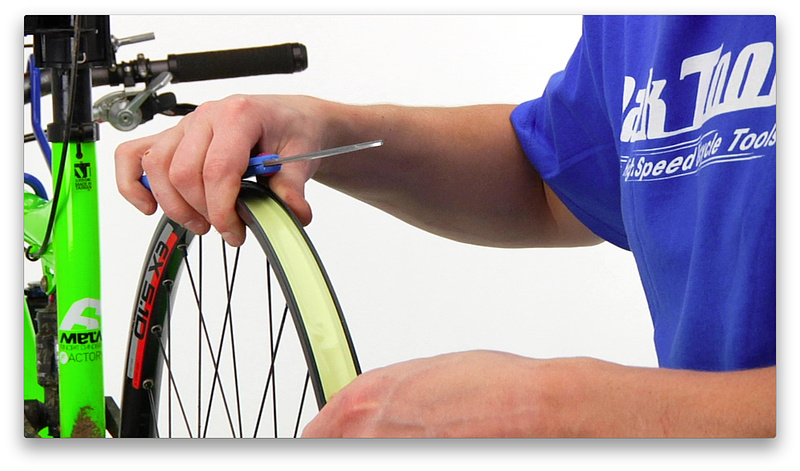
How to ride better: Scrub (Russell Burton)
A good all-round mountain bike will do most things really well, but when you start to specialise in a certain discipline, a specialist bike will always fare best.
When downhill (DH) racing started, there weren’t really specific bikes for it – some riders would lower their seats, but that would be it. It’s a different game now, with riders tackling rocks the size of TVs, huge jumps and punishing drops, the bikes have to be very strong, yet still light and efficient to pedal.
Even so, that won’t count for much if the bike isn’t set up properly. The same goes for four-cross (4X) racing and slopestyle. You could have fun on any old bike with your eyes half shut, but setting your bike up correctly will help you ride better and develop your skills more quickly.
This month, we’re looking at downhill bikes and the sort of short-travel bikes that are aimed at 4X, slopestyle and even light downhill riding. We’ll show you how to set your bike up right, and the techniques you should work on to improve at both disciplines.
On the bike

1. The scrub
This may be one of the more fashionable moves, but it certainly has its place, especially on hipped jumps. As you come up to the take-off, lower your inside elbow and lay the bike down. As you take off you'll fly slightly sideways and stay low to the ground.

2. Wallride
Not so common at races, but slopestyle events always have them, and most trail centres now have wallrides to practise on. The key is carving a shape on them. Aim to pull up on to the wall at a rough 10 or 2 o’clock trajectory, depending on which direction you’re travelling in. Visualise riding the wall as if it’s a steep berm. If you’re too upright you’ll slide down it – hitting it harder will help you get the right angle.

3. Stay low
Jumps are getting bigger and more common in races, so if you do get kicked into the air by one you need to get back to terra firma as quickly as possible. If you want to stay fast, stay low as you go over the jump. stand tall on the take-off transition and let the bike come up towards you as you take-off. When you’re in the air, start to push against the bike to resist it coming up any more, and to initiate landing as soon as possible.

4. Berms
Berms (banked corners) need to be ridden hard to get the best out of them. In 4X, you need to be able to rail and square them. To square a berm, approach inside of the apex, aim about halfway through the berm, and turn as hard as possible when on it. It’s a good way of securing a position if you’re chasing a rider. To rail a berm use the whole curve of the berm for as long as possible, straightening out the turn for speed.

5. Getting air
Sometimes it’s just a laugh to head out and hit some jumps. start by rolling over a table top jump and learning the kick of the transition; then gradually build your speed and how much you pull up until you’re clearing the jump. Once you’ve dialled that, practise throwing your bike around in the air using your hips and body weight – being able to pick up and ‘place’ the bike is a valuable skill.

6. Know your width
Skimming trees with your bars and elbows can slow you down or even end your run if you hit them hard. Find a section with some tight lines between trees or other obstacles and see how close you get as you ride through it. Try getting a friend to video you. You may find you have lots of breathing room and could tighten up your lines, or you might find you’re cutting it fine. Either way, make sure you know your limit.

7. Squashing a jump
4X racing is all about getting the power on the ground. Unless it’s a huge one that warrants going massive, suck up jumps as much as possible. As you come up the transition, stay as low as possible and absorb the lip. As the bike becomes airborne, stand tall on the bike, ready to push it straight back down into the landing.

8. Landing on the brakes
Quite often you’ll land from a drop and will have to make a turn straight away or have to hit the brakes. Learn to land on the brakes – the bike has maximum traction when compressing into the ground, so the action of landing can be used to scrub off loads of speed, very quickly. This doesn’t mean landing with the brakes locked from a flat-out landing.

9. Roots
The key to riding roots is attacking. If you shy away from them, they’ll have you for breakfast – especially wet ones. If you ride half-heartedly, you’ll be slip-sliding your way along. Instead hit roots as square-on as possible. With any roots that could throw you off-line, either hop over them or unweight your bike as you hit them.

10. Ducking and diving
Downhill riding is all about co-ordination – look where you want to go and your body will follow. Concentrate on where you want to go, rather than on the stuff that’s bothering you, and relax your body. Stay loose and you’ll be surprised how fluid you can be.

11. Flat turns
You’ll come across flat turns whatever style riding you do, but short-travel rigs can get a little skippy and wild in the turns. don’t fight it, let the rear end step out. Weight the front of the bike, and even if the rear slides, you’ll still be able to steer. Perfecting flat turns is hard because they’re always different, but practising on wet, dusty, loose, grippy and rough ground will help you develop the skill you need.

12. The rough stuff
Downhill bikes roll amazingly well through virtually anything. Learn to pick your lines and stick to them. There’s always a smoother line, but often the rougher line is the faster line, so try the rougher lines and see how much time they save you. Take a second look at the sections that faze you and ride them at different speeds to find out how hard you can hit a rough section before things get out of shape.

13. Off camber
The first rule of off-camber terrain is ‘mind over matter’. Spot your exit point and focus on it. Don’t be nervous over the off-camber stuff or you’ll be bouncing off trees like a bumblebee. Keep your weight on the tyres to force them to cut into the ground to keep you upright. Get your outside foot down and put all your weight on it. This will position you into the camber correctly.
Bike Setup
Setting your bike up correctly is essential. Your local bike shop will be able to help you make the finer adjustments to suit your riding needs, but our guide will point out what you need to do to get ready to shred – fast.
Downhill bikes: Downhill bikes are made to do a specific job as fast and efficiently as possible. They are typically long and low with very slack angles. They can have anything from 7 to 10in of rear travel, and 7 to 8in up front. They’re the Baja buggies of the bike world, perfect for gravity fuelled sessions, and getting yours set up right will improve your riding no end.

14. Tyres
Large volume tyres offer a large contact area, and soft compound, slow rebound rubber allows the tyre to deform, increasing grip. In dry conditions, choose a shallower tread that will roll fast. In the wet, look for an open, deep tread with knobbles that will cut through the mud and clear quickly. Tyre pressure is another massive factor – harder will roll faster, but will have less grip. Experiment between 25 and 28psi.
15. Disc size
Bigger discs are essential on DH bikes. On shorter and steeper courses, you’ll use the front brake a lot to control speed, but on faster and longer courses you’ll use the back brake more than you realise to scrub speed. This can cook your brake pads and glaze them over, so choose a bigger disc to increase power.
16. Pedals
If you prefer clipped pedals, look for ones with a decent cage – CrankBrothers Mallets or Shimano M545s are ideal. Make sure your shoe has a sturdy feel – try Shimano’s DX or SixSixOne's Filter. Avoid race-style shoes. If you ride flat pedals, find the best pedals for your feet – they should be fairly thin with a big platform. Burgtecs are ideal if you have big feet and a deep wallet, and FiveTens are the current shoe of choice.
17. Chainguide
A decent enclosed chainguide is essential. If your bike has a low bottom bracket height, opt for one with full ring protection. The SRS+ guide from e*thirteen on the bike pictured above is strong yet lightweight.
18. Bar setup
Handlebar choice is down to personal preference, but getting your weight on the front end will help increase traction and grip, so low bars will help. The bike’s front end is already higher than usual thanks to its big fork, so you can go lower than you think with bars. Wide bars increase stability and control at speed and through the rough, but they’re not good on tight tracks and can slow your handling down.
19. Suspension setup
The long-travel suspension needs to track the terrain to offer traction and to be able to get the power down over rough ground, but too soft means a potentially wallowy ride. When you’re in your full riding kit, aim for a quarter to a third of the available travel as sag. If you run the bike on the softer side, low speed compression damping will help keep the bike up in the travel, especially under braking and when pedalling. Given the nature of DH, you’ll hit unexpected obstacles, and you don’t want to be kicked over the bars, so opt for a little more rebound damping than on other bikes – but not so much that the bike packs down on repeated hits.
20. Saddle height
Despite being aimed down steep and gnarly chutes, downhill bikes still have to be pedalled. Find a happy medium for your saddle, between ‘out the way’ and ‘pedalable’. Take a look at pro racers’ bikes, and you’ll notice their saddles creeping higher as course times get closer between riders.
4X/slopestyle bikes: Full-suspension is becoming more and more popular among 4X and slopestyle riders. For 4X, rear suspension improves traction and offers more control on courses with high-speed sections, rock gardens and huge jumps. For slopestyle, it will take the sting out and the bike won’t break at the first sign of trouble. This new breed of hardcore, short-travel bikes is also ideal for short downhill runs, and they’re becoming increasingly useful for more riders.

21. Tyres
Find a happy medium between grip and rolling resistance. Aggressive tread patterns work well in most conditions, but sometimes a semi-slick rear tyre will grip just enough, but roll immensly fast.
22. Fork travel
You can tune the feeling of the bike by adjusting fork travel. Less travel will give you a steeper head angle and a slightly lower bottom bracket (BB). A longer travel setting will relax the head angle and steering, and raise the BB slightly. An adjustable fork will allow you to get the most out of this kind of bike.
23. Cockpit
Being able to adjust your position is useful if you’re playing with your travel settings. A few spacers under your stem can be stacked on top to lower the bars if, for example, you were raising the fork height for a rough track, but didn’t want the bars any higher. Bars slightly wider than the stock 711mm can be handy for taller riders because they lower your weight on the bike and stabilise handling, but the fast natured handling of these bikes can be ruined if you’re running overly wide bars.
24. Close ratio block
Slopestyle riders don’t need many gears, so a nice tight chain will keep the bike quiet. 4X riders need to get out the gate quick, and so need a spread of gears for maximum torque – regular mountain bike cassettes are too varied in the gearing. Road cassettes have a far closer ratio, so make gear changing cleaner and gearing better for sprinting.
25. Pedals
4X racers tend to use SPD pedals for maximum acceleration and slopestyle/freeriders often go for fl at pedals for freedom on the bike – whether that’s for pulling big tricks or being able to bail out at will.
26. Suspension setup
Firmer seems to be better. 4X needs maximum pedalling power distributed to the ground, and slopestylers won’t want wallowy suspension ruining the pop off lips. Quicker rebound up front on a 4X bike gives extra grip, and the same out back can increase pop off lips. If you want to minimise these things, choose a slower rebound setting.
27. Saddle height
It’s all about manoeuvrability, so get the saddle out the way for dynamic moves. Many riders point the nose of their saddles up so they have something to pinch between their knees for stability in the air and through the rough stuff.
Off the bike
Much of being good on a bike is preparing off the bike. You should eat well and look after your body. For downhill and 4X riding, flexibility and power are essential.
28. Stay flexible
Stretching is the key here, but taking classes in yoga or pilates is great for core strength, staying supple and resisting injury. Muscle is basically a spring that recoils, so the looser and more flexible it is, the better.
29. Cross-training
To help develop your recovery and sprint performance, try looking at other sports. Circuit training is a great option for improving recovery, and rowing machines build staying power – great for both DH and 4X. Working out in a gym is also helpful because you can work on specifi c areas you need for riding.
30. Food & drink
To build power in your muscles, taking on protein is essential. Whey powder, an ingredient found in many protein drinks is great for this. For strength, go for red meat. It’s naturally high in protein and creatine, which are important for building muscle. Carbohydrates in pasta, rice and potatoes are great for fuelling up before exercise.
You can follow BikeRadar on Twitter at twitter.com/bikeradar and on Facebook at facebook.com/BikeRadar.
save